
The fabric was a gift a year ago, from my friend and colleague Denise, when I was reeling from the sudden loss of my big brother. She decided I needed a little something to remind me of warmth and loving comfort, and this piece of beautiful printed boiled wool sure fit that bill. She'd won it from Elliott Berman's FabricLove giveaway, and had described it to me - I don't really remember that, but she felt it suited me more than it did her. I have to admit, it was love at first sight!
 |
| A very close view - it's a print with lace and floral motifs, in soft aqua and ivory on gray. |
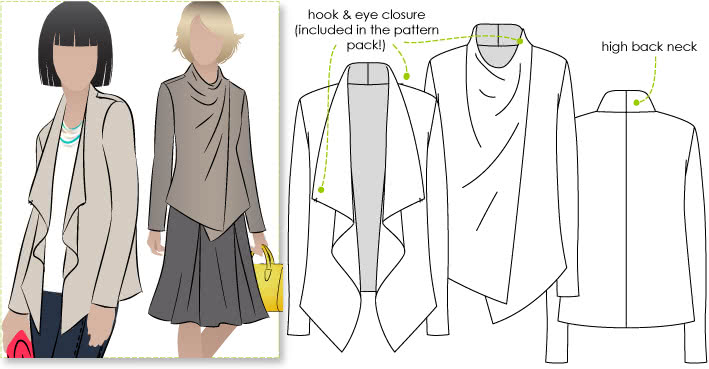 |
| Style Arc Harper Jacket |
Yesterday I decided it was time to bite the bullet and make it happen. I started by tracing off the original pattern pieces used for the muslin, making the changes Donna had pinned for me. To better suit my proportions, she wanted the front hem shorter and front edges less wide - closer to the center - removing between 1 1/2 and 2 1/4 inches from those pieces. The only other change was to shorten the back length in the armhole, so I made a cut from just about the midpoint of the armhole up to the neck edge and overlapped at the armhole to reduce the length of it. I didn't make a corresponding alteration to the sleeve and wondered if it would ease in okay, but decided not to worry about it yet.
Then I made an attempt at laying out the pattern for cutting. Did I mention that the ends were cut crooked? The fabric is a knit, with the boiled wool print on one side, and with the selvedges lined up there was so much single-layer fabric at each end I couldn't see cutting anything out double. Plus, I could not find a way to lay it out and be able to get even one sleeve out of the yardage, let alone two. I really didn't want a vest. I was open to piecing at least the sleeves, but in order to get to that point I really needed to lay out both fronts and both backs (there is is center back seam - one of the features I like most about this pattern - you can get such a nice fit with a center back seam.) So that meant I needed to trace each pattern piece to have its mirror image. Once I had two fronts and two backs, it was clear that I couldn't get even half a sleeve cut lengthwise, so I also created two sleeve patterns split into an upper and lower portion - the horizontal seam would hit somewhere below the elbow, and in a different spot on each arm. (This is a huge leap design-wise for me! I'm pretty anal about symmetry and balance, so deciding to throw caution to the winds and make those two sleeves fit WHEREVER they could is a great stride forward, in my opinion!)
I failed to take a photo of the layout, because when I got it all to fit I was stoked to get it cut out. While I played with the puzzle of the pieces, my husband came in to see what I was up to. I showed him what remained to be placed on the single-layer of fabric, and where my challenges were, and he offered what he obviously felt was a helpful suggestion: "Can't you just slant that piece a little there?" Oh man, I wish some of my sewing students had been there to learn from THAT teachable moment! I explained grainline and what happens when you don't observe it - the description of jeans legs that twist around your legs convinced him that I knew what I was doing!
The pieces all got cut last night, and I left the studio happy - knowing I had today to get in there and stitch this jacket together.
 |
| All that's left of my fabric - this is almost a zero-waste project! |
I mentioned that the fabric is reversible - but it wasn't until I started assembling and got ready to press and finish the first stitched seam that it occurred to me the jacket could also be made reversible. The seams are stitched with the printed sides together, then topstitched. I left the seam allowances unfinished, pressed them open, then to one side.

 |
| Pressed seam with one allowance trimmed |
 |
| Pressing wider allowance over narrower |
 |
| Seam ready to topstitch flat |
There are two large hooks/eyes included with the pattern, designed to be attached at the points of the front opening and the shoulder seams. Since I took a couple of inches off both the front and hem edges, I fell the jacket becomes too short if I hook it at those points, so I've left them off for now. I may use them if I make this again in a softer, drapier fabric. Even without a closure, I am really delighted with the way this came out.
Here are photos on my form - I'll get some of me wearing it, hopefully in the next few days.


 |
| Reverse side. That funky seam allowance on the right shoulder is where I removed the loop of the hook & eye. I've since gone back in and finished the topstitching there. |

Till later!
That looks great Janee and all the hurdles to actually get the whole jacket out of minimal fabric makes it a true “victory”! Maybe you’ll wear it on the 7th?
ReplyDeleteThanks, Mirjana! That's what I plan to do. See you then!
DeleteLooks like a warm and cozy jacket. I look forward to seeing you model it.
ReplyDeleteThanks, Tomasa! I'll try to get a photo at our chapter lunch on Sunday. Stay warm!
DeleteThis is so great. Thanks for sharing.Love from Fabrics World USA
ReplyDelete